Maintaining your Lockplate
by R. Kuchera, Chief Petty Officer, USNLP
The following discourse is a detailed description of how to disassemble, clean, lubricate, and re-assemble the lockplate of an M1861 Springfield. While other lockplates, such as the M1863, Enfield or Colt Special are similar, the photos and descriptions herein apply most directly to reproduction M1861s. The description contained in a reprint of the M1861 manual1 will be the basic guide to unmounting, removal and re-mounting the lockplate.
Everyone is able to maintain the barrel and stock adequately. Dealing with the lock mechanism is ignored for the most part. The lock is subject to all the conditions that rust and corrode the barrel and other steel parts. With a minimum number of hand tools and a main spring vise, anyone should be able to keep the lock in top condition. Figure 1 shows the lockplate with all its parts identified.
Figure 1
Dismounting the lockplate
Before going any further it will be assumed the gun is unloaded and uncapped. Put layers of newspaper or cardboard on the work surface. Pull the hammer back to the half-cock position. Place the gun, lockplate down, on the work surface. Carefully unscrew the two lockplate screws. Exercise care if you remove the two washers or you might split wood out of the stock. If they do not come out easily, place a bit of tape over them so they will not fall out and be lost. It would be handy to place all the parts in a small box. Remove the screw that holds the hammer to the tumbler. Gently remove the hammer. If the hammer will not come off easily, then light taps with a rawhide or plastic hammer and a BRASS drift punch may be necessary. Extremely difficult cases may require use of penetrating oil. Support the lockplate with a couple of wood blocks or in a vise with the long portion carefully supported across the jaws. Try the brass drift and light tapping method. Do not use a steel punch or excessive force with a hammer.
Disassembly of the lockplate
Place the lockplate, with the innards facing you, on the work surface. Orient the plate so the mainspring is on the left and the smaller Sear spring to the right. Take a dry wiper and wipe off the loose stuff adhering to the lockplate and its attendant parts.
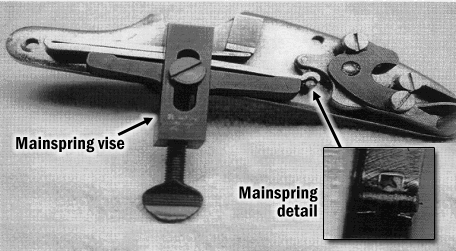
Remove the mainspring. Place the mainspring vise such that the thumbscrew is on the bottom of the spring (see figure 2). If a vise is not available a set of ViseGrips will do. The ViseGrips should be adjusted to compress the spring sufficiently to unhook the tumbler link. Take care to not nick the spring with the jaws. Take up enough turns on the thumbscrew to cause the two fingers (see Mainspring detail) on the lower, right leaf of the spring to come loose of the mainspring swivel (a.k.a. as a tumbler link or stirrup). It may take a bit of work to get the spring to separate from the lockplate as it is held in place by a small round locating pin. A screwdriver blade under the spring to pry will generally do the job. Tougher cases may need a pair of pliers. The fingers will separate from the swivel readily. Carefully undo the spring vise thumbscrew.
Figure 2
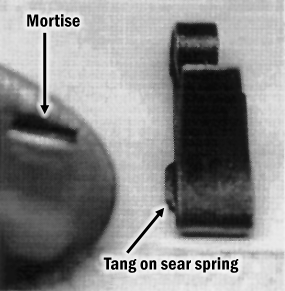
Remove the sear spring and screw. Loosen the sear spring screw several turns but do not unscrew it all the way. Using pliers, pop the sear spring tang (a small, flat metal protrusion) from the mortise or indentation on the lockplate. This relieves most of pressure from the screw and you may continue carefully removing it (see figure 3).
Figure 3
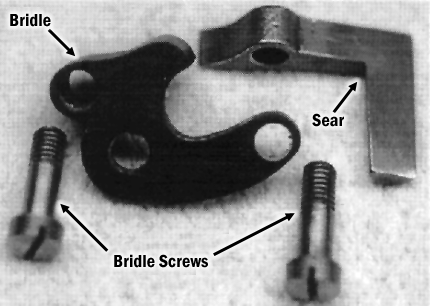
Remove the bridle screws. On some lockplates there is a decided difference, in the length of the threads, between the upper and lower screws. Carefully remove and label the lower screw. This should allow the sear to come loose from the lockplate. Remove the sear. Now remove and label the upper screw. The bridle will come loose and can be removed (see figure 4). This will expose the tumbler.
Figure 4
Remove the Tumbler. This should require no force to remove from the lockplate. If it does, use the Brass drift and hammer as previously mentioned. This completes the disassembly (see figure 5).
Figure 5
Cleaning
Clean the lockplate and all the attendant parts. Soap and water, alcohol or any cleaning solvent can be used. Be sure the cleaning compound is not flammable. Most solvents recommend outdoor use. Use on old toothbrush or small painter’s brush to clean out all the nooks and crannies. Dry all parts carefully with a clean wiper. Make sure all old congealed grease has been removed. Dry all parts thoroughly. Inspect all parts for wear. If any rusting has occurred, use a small brass brush or piece of crocus cloth. In extreme cases even #400 or #600 wet/dry sandpaper can be used. Remember to only take off the rust. Inspect the tumbler shaft hole in the lockplate for excessive wear. Excessive wear may require the replacement of the plate or tumbler. Any light rust in the hole can be burnished with a rolled up piece of crocus cloth and a pencil. Burnish off any nicks or protrusions that interfere with the working parts. Do not use a file on any lockplate parts.
Lubrication
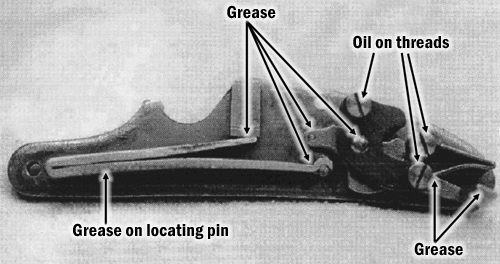
The point to be made here is do not over-lubricate. Avoid the use of animal and vegetable oils. These types of oils tend to congeal and lose their lubricating qualities when exposed to heat, fumes and admixture with gunpowder. Where called for use a quality sodium or lithium base grease. There are a large number of good quality oils that can be used. A toothpick works well for applying small quantities of oil or grease. Oil all threads as it nearly impossible to get the correct sense of “tight” with dry threads (see figure 6).
Figure 6
Re-assembling the lockplate 2
Before beginning the re-assembly carefully examine the lockplate and all the associated parts. Check all holes and threads for dirt. Check for evidence of binding, score marks, burrs and scratches. Dirt is easily removed from holes with pipe cleaners. Canned compressed air is useful in this respect also. Damaged threads must be carefully re-threaded. A word of caution on this issue, most of the reproduction arms use metric threads. Careless use of standard American machine taps and dies may cause more problems than they cure. The cure for binding, scores, burrs and scratches requires the careful application of an abrasive to remove the problem. This can take the form of Crocus cloth, "Wet-or-Dry" sandpaper (this comes in numerous coarseness grades), India or Arkansas stones and wood used with materials such as valve grinding compound. Files are not recommended and if used it should be as a last resort. To finish off external aberrations use a cotton buffing wheel loaded with Jeweler’s Rouge or Tripoli it puts a nice finishing touch to the job. Make sure to remove all abrasive material before re-assembly. Wipe the entire surface of the lockplate and all parts with an oiled wiper. See figure 6 for specific points to lubricate. Proceed as follows:
1. Coat the arbor (shaft) of the tumbler with grease. Insert the tumbler, square-end to the outer surface. Rotate the tumbler to check for binding. The tumbler link should be at about the 9 o’clock position and the half-cock notch at about 6 o’clock . If the tumbler link is removable, now is the time to put it back on the tumbler.
2. Oil the threads of the two bridle screws. Grease the pivot hole in the middle of the bridle in which the tumbler rotates. Using the locating pin on the bridle, position the bridle and insert the upper screw. Lightly tighten the screw. Put a small amount of grease in the hole through the sear. Insert the sear under the bridle with the protruding finger towards you. The finger is semi-circular in cross section. Align the holes in the bridle and sear. Insert the lower screw but not tighten fully. Check for fit and binding. Check the engagement of the sear and the half cock and full cock detents on the tumbler. Tighten both screws. With both screws tightened rotate the sear, as much as possible. If any binding is noted other measures may be necessary 3. Binding will increase the trigger pull effort dramatically. Too much tightening on the lower bridle screw will also cause binding.
3. The tiny link on the tumbler should work freely without rubbing on the lockplate. Place a small amount of oil on the threads of the sear screw. Place the sear spring on the back of the lockplate and put a small amount of grease at the point the sear spring touches the sear. Put the sear screw through the loop on the spring and turn it in part way. It will be necessary to use pliers to partially collapse the spring to get the tang to set in the mortise. Once this is done, snugly tighten the screw.
4. Before re-attaching the mainspring put a small amount of grease on the pivot pin, at the point where the upper leaf touches the lockplate and the two-fingers on the lower leaf. Compress the spring fully. Set the locating pin in the lockplate and the two-fingers into pin on the tumbler link. Slowly release the spring vise. When the two-fingers seat on the tumbler link and there is no pressure on the vise, lightly tap the mainspring. This helps assure the spring is seated.
5. Apply a small amount of grease on the semi-circular portion of the sear arm.
Re-mounting the lockplate
Make sure nothing has been left out and that all screws have been tightened. Carefully place the lockplate in the stock. Turn the stock over, making sure to support the lockplate. After oiling the threads, insert the two lockplate screws through the washers. Start the threads and snug each alternately. Before placing the hammer back on the tumbler put a small amount of grease on the 4 sides of the square tumbler shaft. Put a drop of oil on the hammer retaining screw threads and tighten it. Check that none of the screws from the lock mechanism or the lockplate retaining screw protrudes through the lockplate. This might impede the free action of the hammer.
Place a thick piece of leather over the nipple. Check the workings of the lock by moving the hammer from half cock to full cock. You can either pull the trigger while restraining the hammer with your other hand or let the hammer fall on the piece of leather. The action should be relatively smooth with no binding. Check that the half-cock (safety) position is positive and will not allow the gun to be fired.
When the lock has been correctly adjusted and cleaned the trigger pull should be in the 7 to 10 pound range.
References:
1 Rules for the Management and Cleaning of the Rifle Musket, Model 1861, for the use of soldiers. E.S. Allin, 1862. (pertinent portion quoted here)
Order in which the lock is taken apart.
1. Cock the piece, and put the spring vise (49) on the mainspring; give the thumb-screw a turn sufficient to liberate the spring from the swivel (21) and mainspring notch (19 c). Remove the spring;
2. The sear-spring screw. Before turning this screw entirely out, strike the elbow of the spring with the screw-driver, so as to disengage the pivot from its mortise: then remove the screw and spring;
3. The sear-screw and sear;
4. The bridle screw and bridle;
5. The tumbler screw;
6. The tumbler. This is driven out with a punch inserted in the screw-hole, which at the same time liberates the hammer.
7. Detach the mainspring swivel from the tumbler with a drift punch.
The lock is re-assembled in the inverse order of taking apart, viz.:
1. Mainspring swivel;
2. Tumbler and hammer;
3. Tumbler screw;
4. Bridle and screw;
5. Sear and screw;
6. Sear-spring and screw;
7. Mainspring.
Before replacing the screws, oil them lightly with good sperm-oil, putting a drop on the point of the screw; also on the arbor and pivot of the tumbler; between the movable branches of the springs, and the lock-plate; on the hook and notches of the tumbler.
2 The lead paragraph dealing with "Re-assembling the lockplate" has been expanded at the suggestion of Jim "Gunney" Genovese. 1/26/03
3 The author has found that when the lower bridle screw is tightened the bridle bends several thousandths of an inch. This can cause the sear to bind. Original bridle screws were slightly different in that they had fewer threads on the lower screw. Therefore you could not tighten the lower screw to this extent. However, reproduction screws are threaded the same lengths. Two possible workarounds might be used. One is the use the non-permanent type of Loctite on the threads. The other is to nick the top thread or so of the screw with a pin punch. In the former treatment, carefully apply the Loctite to the screw threads. Adjust the screw to a point where no binding occurs and then let the Loctite setup. The later method requires careful measurement and observation to find the right thread to nick. Either way prevents the screw from being tightened beyond the bind point.


